
For interactive lessons on the WBiPro Interactive Smart Projector, accuracy is key. Learning how to calibrate the WBiPro ePen synchronizes your physical ePen movements with the digital cursor on your Windows laptop. This post provides the specific steps to run a professional-grade calibration.
Quick Selection Guide: Which Calibration Method Do You Need?
Before you begin, choose the calibration path that matches your current setup needs:
- Option 1: Auto Calibration (Recommended for Daily Use) — Select this for a rapid, automated sync that takes less than 5 seconds. Perfect for routine classroom setups where the projector has not been physically moved.
- Option 2: 15-Point Manual Calibration (Recommended for Precision Setup) — Select this if you notice cursor drift, offset tracking, or if you have recently adjusted the projector’s position.
Option 1: Standalone Auto-Calibration (Fastest Method)
Step 1: Launch the OwayIWB Utility
Once the WBiPro Projector is setup, the system’s dashboard will appear. Use the WBiPro remote control to navigate to and launch the OwayIWB app.
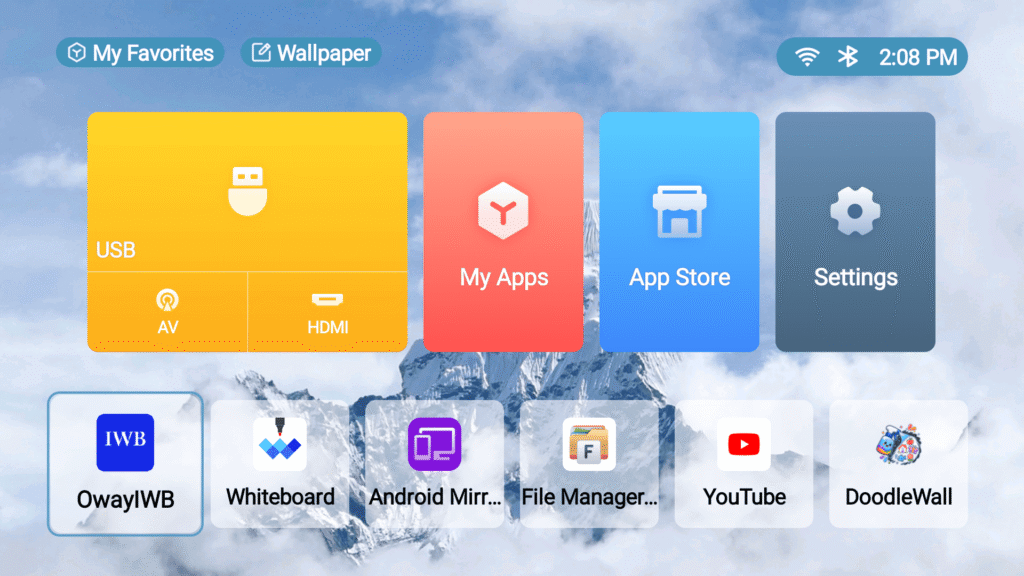
Step 2: Click on AUTO CALIBRATE
Select the AUTO CALIBRATE option on-screen, and the system will execute the alignment process automatically.
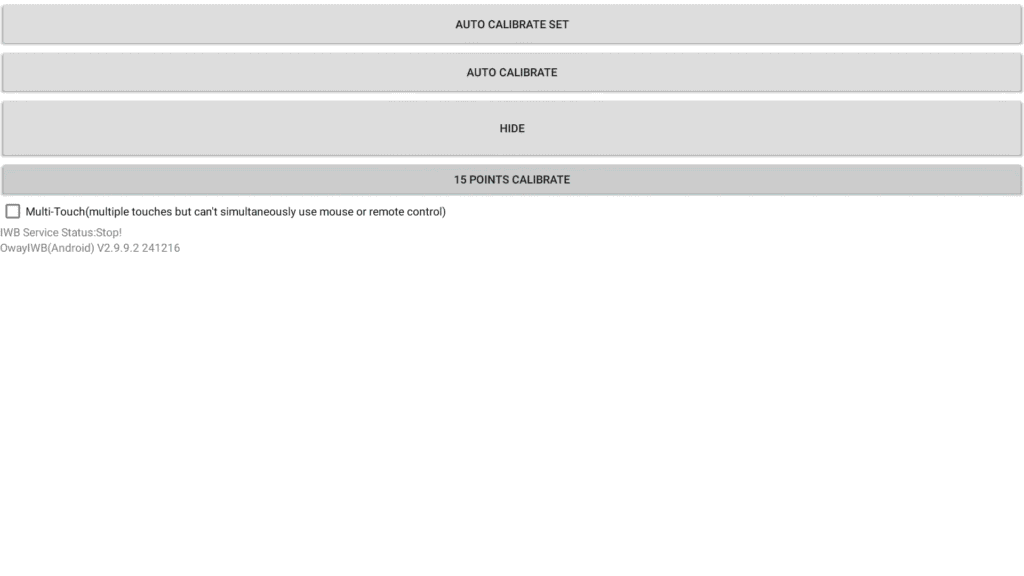
🔴 Setup Note: To ensure auto-calibration succeeds, verify that:
- The projection is sharply in focus.
- There are no physical obstructions between the projector sensor and the screen.
- You do not move the projector post-calibration, as shifting the device will invalidate the point accuracy.
Option 2: 15-Point Manual Calibration (High-Precision Method)
Step 1: Launch the OwayIWB Utility
Open the OwayIWB application from your main projector dashboard using the remote control.
Step 2: Click on the 15 POINTS CALIBRATE option
Select the manual 15-point configuration utility from the main calibration menu.
Step 3: Manual ePen Calibration Process
- A sequence of 15 crosshairs will appear one by one, starting from the top left and moving toward the bottom right.
- Use your ePen to firmly tap the exact center of each crosshair.
- The system will automatically advance to the next point once the touch input is registered.

🔴 Setup Note: Ensure your ePen is powered by two fresh AAA batteries before starting the 15-point sequence.
Frequently Asked Questions
Why does my ePen cursor lose accuracy after a few days?
If the projector or the projection surface has been bumped or moved, the coordinate map is no longer valid. Simply re-run the Auto Calibrate or 15 Points Calibrate process to restore precision.
The calibration crosshair won’t disappear—what’s wrong?
Ensure you are holding the ePen at a 90-degree (perpendicular) angle to the wall. If the tip is angled, the optical sensor cannot accurately register the press. Also, check that your ePen has fresh 2 AAA batteries.
Do I need to recalibrate when switching modes?
Yes, you do. Because Windows and the standalone Android OS handle screen resolution, aspect ratios, and touch-driver inputs differently, your ePen must be re-synced to the specific coordinate map of the active operating system.
Can I calibrate while the room is brightly lit?
Yes, but avoid direct sunlight hitting the projection surface, as excessive infrared light can interfere with the ePen’s signal and cause calibration failure.
Best Practices for ePen Calibration Precision
To minimize the need for frequent recalibration, keep these factors in mind:
- Angle of Attack: Always hold the ePen perpendicular (90 degrees) to the projection surface. Angled contact creates “parallax” where the tip touches the wall, but the optical sensor registers a slightly different location.
- Environmental Lighting: Ensure no direct, high-intensity spotlight or direct sunlight is hitting the projection area. Infrared interference can confuse the ePen’s sensors.
- Power Supply: Weak batteries lead to inconsistent signal strength. If you notice “jittery” lines while writing, swap for fresh AAA batteries immediately.